Understanding Column Span and Row Span

These 2 features allows you to expend your row  and columns across multiple other columns and rows when they would usually be forced to stop. In this tutorial we will learn how to use these attributes.

Why we need this:

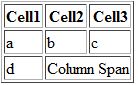
Normally when we create a cell, the cell can not pass over into the space bellow or above another cell. For instance look at the example bellow. The cell in the bottom row can not move past the length of that on the top row without extending the both cells.
 
As you can see the row e is not able to reach the cell 3. Using the column span attribute we can solve this problem and make it more organize.
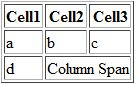
 The attribute for column span is < TD COLSPAN="X">

"X" is the number of columns you want to extend the span. For example, You have a table of 3 column and you want to extend it upto 2 column, so how you will do it? Just put 2 instead of "X". Here is the example :

Now see another example where we can extend the span upto 3 column
I will add the codes at the end of the tutorial 

Row Span

In row span it extends the cells on vertical row (up and down). The attribute for this one is
<TD ROWSPAN="X">  Same is column span the "X" is the number of cells you want to extend vertically.

 <TD ROWSPAN="2">  applied here. So we extended the cell for 2 rows vertically. Now lets see for 3 rows
We just use 3 instead of X. You can use as many span as you want. The codes are bellow for both column and Row span. .

Column Span:

<!DOCTYPE HTML>
<html lang="en-US">
<head>
    <meta charset="UTF-8">
    <title>Column Span</title>
</head>
<body>

<TABLE BORDER="1">
  <tr>
    <th>Months</th>
    <th>year</th>
    <th>Salary</th>

  </tr>
  <tr>
    <td>January</td>
    <td>2016</td>
    <td>$800</td>
  </tr>
   <tr>
    <td>February</td>
    <td>2016</td>
    <td>$800</td>
  </tr>
  <tr>
    <td colspan="3">Total=$1600</td>

</TABLE>

</body>
</html>

Row Span 

<!DOCTYPE HTML>
<html lang="en-US">
<head>
    <meta charset="UTF-8">
    <title>Row Span</title>
</head>
<body>


<TABLE BORDER="1">
  <tr>
    <th>Months</th>
    <th>year</th>
    <th>Salary</th>
    <th rowspan="3">Total=$1600</th>

  </tr>
  <tr>
    <td>January</td>
    <td>2016</td>
    <td>$800</td>
  </tr>
   <tr>
    <td>February</td>
    <td>2016</td>
    <td>$800</td>
  </tr>
  <tr>

</TABLE>

</body>
</html>

I hope this will help you to understand, practice it and if you found any problem let me know in comment or in our facebook page. Feel free to share if it helped you. Best of Luck

MARGIN ATTRIBUTE

Like any other document we can select TOP, BOTTOM, LEFT, RIGHT Margin for HTML document

Here is an example 

<HTML>
<HEAD>
<TITLE> Example of Margin Attribute </TITLE>
</HEAD>
<Body background=bg.jpg LEFTMARGIN="100" RIGHTMARGIN="60">
<H1>This is Tanjies </H1>
<P><Strong>Services we are providing</strong></p>
<OL>
<Li>Web Development
<Li>Search Engine Optimization
<Li>Web Application
<Li>Social Media Marketing
</OL>
<P><Strong>Themes We are Using </strong></p>
<OL>
<Li>The 7
<Li>Avada
<Li>Jollyall
<Li>Udesign
</OL>
<Body>
</HTML>

The saving procedure is like before, but if u face something wrong then don't forget to write me. 


BACKGROUND ELEMENT

With this element we can change the background with image. For this we can use JPG, PNG, GIF,JPEG image. In the beginning we have said we need to keep HTML files in a folder. If you didnt do that yet, now its time to do that. To use the image as background we must need to keep those where are the HTML files. We cam make a folder name "test" and keep html files there and also save those images insider "test" folder. We can also create a folder inside test folder and name it Image and keep image files there. Lets try.

The format is <Body Background=filename.jpg>

 Here is the Example

 
<HTML>
<Head>
<Title> Example of Background Image</Title>
</Head>
<Body background=bg.jpg>
<H1>This is Tanjies </H1>
<P><Strong>Services we are providing</strong></p>
<OL>
<Li>Web Development
<Li>Search Engine Optimization
<Li>Web Application
<Li>Social Media Marketing
</OL>
<P><Strong>Themes We are Using </strong></p>
<OL>
<Li>The 7
<Li>Avada
<Li>Jollyall
<Li>Udesign
</OL>
<Body>
</HTML>

The saving procedure is like before, but if u face something wrong then don't forget to write me. 


BGCOLOR ELEMENT(Background Color)

We didnt add any background color yet. Now we will add background color. We have to put it as attribute under the <BODY> tag. For color we can directly add RED, GREEN, BLUE, WHITE or we can use the HEX CODE. 

Program 

<HTML>
<HEAD>
<TITLE> Example of BG COLOR ELEMENT</TITLE>
<HEAD>
<BODY BGCOLOR=RED>
<H1>TANJIES DESIGN </H1>
<LI>Web Designing</LI>
<LI>Search Engine Optimization</LI>
<LI>Web Application</LI>
</BODY>
</HTML>

Example 2

<HTML>
<HEAD>
<TITLE> Example of BG COLOR ELEMENT</TITLE>
<HEAD>
<BODY BGCOLOR=#FF0000>
<H1>TANJIES DESIGN </H1>
<LI>Web Designing</LI>
<LI>Search Engine Optimization</LI>
<LI>Web Application</LI>
</BODY>
</HTML>

For Hex code you can check our old post, HEX CODE

The saving procedure is like before, but if u face something wrong then don't forget to write me.


Nested Unordered List with Attribute

We have learned Unordered list. We can define the bullet by using the attribute TYPE. Generally we use SQUARE, CIRCLE, and DISK bullet.

Here is an example:
<HTML>

<HEAD>

    <TITLE> Example of Nested Ordered List with Attribute </TITLE>

</HEAD>

<BODY>

    <H1>Tanjies Web designing</H1>

<P> <STRONG> Our Features</STRONG></P>

    <UL>

        <LI>Web Desinging

        <UL TYPE = CIRCLE>

        <LI>Responsive Design

        <LI>Customized Website

        <LI>Wordpress Site</UL>
    </UL>
    <UL>

        <LI>Search Engine Optimization

        <UL TYPE = SQUARE>

        <LI>Back Linking

        <LI>Bookmarking

        <LI>Blogging</UL>

    </UL>

</BODY>
</HTML>

I hope this will help you to understand, practice it and if you found any problem let me know in comment or email me in srv2013@gmail.com. Feel free to share if it helped you. Best of Luck

All rights reserved by Tanjies Design

Full HTML Tag Part 2


Bold tags are only applicable for HTML 5


<em>
Defines emphasized text
<embaded>
Defines a container for an external (non-HTML) application
<fieldset>
Groups of related elements in form
<figcaption>
Defines a caption for a <figure> element
<figure>
Specific self-contained content
<font>
Defines font,color, and size for text(not supported in html 5)
<footer>
Defines a footer for document or section
<form>
Defines a HTML form for user input
<frame>
Defines a frame(window) in frameset(Not supported in HTML5)
<frameset>
Defines a set of frames (Not supported in HTML 5)
<h1>to <h6>
Defines HTML headings
<head>
Defines information about the document
<header>
Defines a header for document or section
<hgroup>
Defines a group of heading
<hr>
Defines a thematic change in content
<html>
Defines the root of html document
<i>
Defines a part of text in an alternate voice or mood
<iframe>
Defines an inline frame
<img>
Defines a image
<input>
Defines an input control
<ins>
Defines a text that has been inserted into a document
<kbd>
Defines keyboard input
<keygen>
Defines a key-pair generator field (for forms)
<label>
Defines an label for <input> element
<legend>
Defines a caption for a <fieldset> element
<li>
Defines list element
<link>
Defines a relationship between a document and external resources
<main>
Specifies the main content of a document
<map>
Defines a client side image-map
<mark>
Defined marked highlighted text
<menu>
Defines a list/menu of commands
<menuitem>
Defines a menu/command item that the user can invoke from a pop menu
<meta>
Defines metadata about HTML document
<meter>
Defines a scalar measurement within a known range

Complete Index HTML Tags Part 1


*** Bold tags are only available for HTML5


<! --.. --> Define Comment
<!DOCTYPE> Define the document type
<a> Define a hyperlink
<abbr> Define Abbreviation or an Acronym
<acronym> Define an Acronym(Not Supported in HTML5, use <abbr> instead)
<address> Define Contact information
<applet> Java Applet(Not Supported in HTML5, Use <Object> instead)
<area> Define an area inside image-map
<article> Define an article
<aside> Define content aside from the page content
<audio> Define sound content
<b> Define bold text
<base> Specifies the base URL/target for all relative URL in the document
<basefont> Specifies a default color,size and font for all text in a document(Not supported in Html use CSS instead)
<bdi> Isolates a part of text that might be formatted in a different direction from other text outside it.
<bdo> Overrides the current text direction.
<big> Define big text (Noit supported in HTML5, use CSS instead)
<blockquote> Define a section that is quoted from another source
<body> Define the documents body
<br> Define a single line break.
<button> Define a clickable button.
<canvas> Use to draw graphics, on the fly, via scripting (Usually Java script)
<caption> Define a table caption.
<center> Define center text(Not supported in HTML5, use CSS instead)
<cite> Define the title of work.
<code> Defines a piece of computer code
<col> Specifies column properties for each column within a <colgroup> element
<colgroup> Specific group of one or more column in a table for formatting.
<datalist> Specifies a list of pre-defined option for input control.
<dd> Defines a descriptive/value of a term in description list.
<del> Define text that has been deleted from document.
<details> Defines additional details that the user can view or hide
<dfn> Represent the defining instance of a term.
<dialog> Define a dialog box.
<dir> Define a directory list (Not supported in HTML5. Use <ul> instead)
<div> Define a section in a document
<dl> Define a description list
<dt> Defines term/name in a description list.