How to have image and text side by side

 How to have image and text side by side:


image and text side by side
Lots of people are asking how they can put image and text side by side. Just make sure you are using style and classes properly. 

<html>
<title>
How to have image and text side by side
</title>
<style>
.icon {
 margin-left:2%;
float:left; 
height:60px;
width:100%; 

.container2 {
    width:auto;
    height:auto;
    padding:1%;
    float:left;
}
h4{margin:0}
.left {float:left;width:60px;}
.right {float:left;margin:0 0 0 5px;width:215px;}

</style>
<body>


</body>

</html>

<div class='container2'>
        <div class="left">
            <img src='https://images-na.ssl-images-amazon.com/images/I/31ArOQ2bqHL.jpg' class='icon'>
        </div>  
    <div   class="right" >
    <h4>Twitter</h4>
    <div style="font-size:.7em;width:180px;float:left;">Twitter is an American microblogging and social networking service
    <br><b>CEO: </b>Parag Agrawal</div>
    </div>
</div>


Menu Hover Style Using HTML5 and CSS3

Creating a Menu Hover style with HTML5 and CSS3.

HTML

 <html>
<head>
    <title>This is Menu</title>
    <link rel="stylesheet" type="text/css" href="menu.css">
    </head>
    <body>
    <ul>
        <li><a href="#">Home</a></li>
        <li><a href="#">About</a></li>
        <li><a href="#">Blog</a></li>
        <li><a href="#">Portfolio</a></li>
        <li><a href="#">Contact</a></li>
        </ul>
   
    </body>
</html>


CSS 

body{
    margin: 0px;
    padding: 0px;
    font-family: serif;
}
ul {
    position: absolute;
    top: 50%;
    left: 50%;
    display:flex;
    transform: translate(-50%,-50%)
}
li{
    list-style: none;
}

a {
    position: relative;
    display: block;
    text-decoration: none;
    text-align: center;
    margin: 0 25px;
    color:#252625;
    font-size: 30px;
    text-transform: uppercase;
    transition: .5s;
    padding: 5px 10px;
   
}
a:before{
    content: "";
    position: absolute;
    bottom: 12px;
    left: 12px;
    width: 12px;
    height: 12px;
    border: 3px solid #ffc107;
    border-width: 0 0 3px 3px;
    transition: .5s;
    opacity: 0;
}
a:after{
    content: "";
    position: absolute;
    top: 12px;
    right: 12px;
    width: 12px;
    height: 12px;
    border: 3px solid #ffc107;
    border-width: 3px 3px 0 0;
    transition: .5s;
    opacity: 0;
}
a:hover{
    color: #fff;
    background-color: #ffc107
}

a:hover:before{
    bottom: -8px;
    left: -8px;
    opacity: 1;
}
a:hover:after{
    top: -8px;
    right: -8px;
    opacity: 1;


Main Seletors in CSS

There are lots of selectors in CSS but here are 4 main selectors your might need.

Selector
.class
Example:
.intro
Example with description:
Select all the classes with name ="intro"
Selector
#id
Example:
#firstname
Example with description:
Select all the element id="firstname"


Selector
element
Example: 

p/H
Example with description:
Select all <p>/<H>elements.


Selector
element element
Example:
<div> <p>
Example with description:
Select all <p> inside a <Div>


There are lot more selectors, Will add those soon

Video Tag

This is a new tag for HTML 5. This tag might not work in older browsers. We need some attributes for this tag, Source, Type, Width ,Height and Control. We need to tell the browser where is the source of the video and the type, what type of video the browser should expect. We must control attribute otherwise we can not play the video properly. The tag is

<video>
</video>

Example

<!DOCTYPE html>
<html>

<head>
       <meta charset="utf-8"  />
       <title>Video Tag</title>
</head>

<body>

           <video width="640" height="360" controls>
           <source src="gameplay.mp4" type="video/mp4">

If you can see this , you need to update your browser.
           </video>

</body>
</html>


We can use some other controls to start auto play when  browser loads and loop to play video over and over again


 <video width="640" height="360" controls autoplay loop>


Just let me know if you have any question 

HTML Attributes

All HTML elements can have Attributes. Attributes provides additional information about the element.  Attributes are always specified at the start of tag.

The lang Attribute

The language of the document can be declared in <html> tag. The language is declared with lang attribute. Declaring a language is important for accessibility application. and search engines.

<!DOCTYPE html>
<html lang ="en-US">
<body>
...............
................
</body>
</html>

A few new tags to learn

There are a lot more tags, but we will just cover few more for now, mostly straightforward to use and you can see the effect in your web page when you use them:

<q> - The q tag is for quote. This has no relationship to the somewhat confusing sing and double quote character, rather it's used when you want to quote a person or written work in your web pag. It is customarily displayed using quotation marks, again unrelated to strings. thus <q>Brevity is beautiful</q>

 <blockquote> - If you want to quote a larger passage, you may want to use blockquote , which will typically set the quoted text apart from the surrounding text and indent it, to make clear that it is quoted text.

Early to bed and early to rise, makes someone healthy, wealthy and wise-Benjamin Franklin
 <hr> - This one might be debatable, HR originally stood for "Horizontal Rule", i.e. horizontal line across width of the text. It's still there in HTML , but now is officially supposed to represent a "thematic break" in the content.


Understanding Column Span and Row Span

These 2 features allows you to expend your row  and columns across multiple other columns and rows when they would usually be forced to stop. In this tutorial we will learn how to use these attributes.

Why we need this:

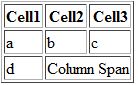
Normally when we create a cell, the cell can not pass over into the space bellow or above another cell. For instance look at the example bellow. The cell in the bottom row can not move past the length of that on the top row without extending the both cells.
 
As you can see the row e is not able to reach the cell 3. Using the column span attribute we can solve this problem and make it more organize.

 The attribute for column span is < TD COLSPAN="X">

"X" is the number of columns you want to extend the span. For example, You have a table of 3 column and you want to extend it upto 2 column, so how you will do it? Just put 2 instead of "X". Here is the example :

Now see another example where we can extend the span upto 3 column
I will add the codes at the end of the tutorial 

Row Span

In row span it extends the cells on vertical row (up and down). The attribute for this one is
<TD ROWSPAN="X">  Same is column span the "X" is the number of cells you want to extend vertically.

 <TD ROWSPAN="2">  applied here. So we extended the cell for 2 rows vertically. Now lets see for 3 rows
We just use 3 instead of X. You can use as many span as you want. The codes are bellow for both column and Row span. .

Column Span:

<!DOCTYPE HTML>
<html lang="en-US">
<head>
    <meta charset="UTF-8">
    <title>Column Span</title>
</head>
<body>

<TABLE BORDER="1">
  <tr>
    <th>Months</th>
    <th>year</th>
    <th>Salary</th>

  </tr>
  <tr>
    <td>January</td>
    <td>2016</td>
    <td>$800</td>
  </tr>
   <tr>
    <td>February</td>
    <td>2016</td>
    <td>$800</td>
  </tr>
  <tr>
    <td colspan="3">Total=$1600</td>

</TABLE>

</body>
</html>

Row Span 

<!DOCTYPE HTML>
<html lang="en-US">
<head>
    <meta charset="UTF-8">
    <title>Row Span</title>
</head>
<body>


<TABLE BORDER="1">
  <tr>
    <th>Months</th>
    <th>year</th>
    <th>Salary</th>
    <th rowspan="3">Total=$1600</th>

  </tr>
  <tr>
    <td>January</td>
    <td>2016</td>
    <td>$800</td>
  </tr>
   <tr>
    <td>February</td>
    <td>2016</td>
    <td>$800</td>
  </tr>
  <tr>

</TABLE>

</body>
</html>

I hope this will help you to understand, practice it and if you found any problem let me know in comment or in our facebook page. Feel free to share if it helped you. Best of Luck

MARGIN ATTRIBUTE

Like any other document we can select TOP, BOTTOM, LEFT, RIGHT Margin for HTML document

Here is an example 

<HTML>
<HEAD>
<TITLE> Example of Margin Attribute </TITLE>
</HEAD>
<Body background=bg.jpg LEFTMARGIN="100" RIGHTMARGIN="60">
<H1>This is Tanjies </H1>
<P><Strong>Services we are providing</strong></p>
<OL>
<Li>Web Development
<Li>Search Engine Optimization
<Li>Web Application
<Li>Social Media Marketing
</OL>
<P><Strong>Themes We are Using </strong></p>
<OL>
<Li>The 7
<Li>Avada
<Li>Jollyall
<Li>Udesign
</OL>
<Body>
</HTML>

The saving procedure is like before, but if u face something wrong then don't forget to write me.